Rav4EV FAQ (Owner - 2002(3) and earlier)
The Following links will jump you to the relevant
spot on this page. Scrolling through the page will allow you to read all info.
Please note that this page exists because of the
invaluable input from so many knowledgeable drivers. I just collect the
knowledge and store it here for everybody's benefit. If you have something
to add/subtract/correct, please don't hesitate to me at: info
at evnut dot com.
Batteries and charging.
Tires/Wheels/Brakes/Suspension.
About the vehicle (Misc?).
Toyota service and warranty.
How To...
Q:
What do the LEDs on the TAL charger indicate?
A: The single white LED indicates that charging is taking
place, no matter the SOC. If no green LEDs are lit, then the SOC of the vehicle
is between zero and 24%. When the first green LED lights, the SOC is at 25%.
The second green LED indicates 50%, the third green LED indicates 75% and the
fourth green LED will light when 95% SOC has been reached. If all four green
LEDs are lit and the white indicator has extinguished, then charging completed
after 100% SOC was reached. I have heard from several drivers who assume that
they are "empty" when no green LEDs light when they first plug in.
In fact, the pack could be at 24% SOC without that first green LED being lit.
Note: Both the analog SOC gage on the dash and Rav4INFO are active when the
vehicle is being charged. Use one or the other if higher resolution of the SOC
is required.)
Q:
What happens during charging with a TAL charger?
A: Lots of stuff!
- Charge port fan is thermostatic. May not come on immediately
when charging in cold conditions. If warm enough, port fan will start if un-powered
paddle is inserted.
- TAL charger fans are also thermostatic. May not come on immediately
when charging in cold conditions.
- Charger paddle IR outputs a repeated ID broadcast once paddle
is unholstered.
- Car recognizes a paddle in the charge port via two switches.
One mechanical (small tab seen in charge port) and the other is triggered
by permanent magnets on the paddle (also how the charger senses whether the
paddle is in or out of the holster). Magnetic switch causes the car to go
through initial charge wake up (relays click, the charge port fan is enabled
and will operate if/when the port is warm enough etc.) and to establish IR
communication with the charger. This much paddle-triggered activity by the
car occurs even if the charger has no line power.
- The car controls all the normal functions of the charger via
the IR link. If charger is not powered, (and presumably if communications
is not established for other reasons as well) the car exits charge mode after
about 20 seconds (At this point, some people assume that
the Aux battery can be rapidly drained). If comm is good, the charge LED
on the charger lights, and the car sends state of charge info to the charger
which the charger's LEDs display; the car's battery fans come on.
- The car then requests charge current from the charger. When
charging begins. the charger's fans are enabled and will operate if/when the
charger's heat sink is warm enough. When charge current is received, the car's
DC to DC converter comes on, charging the aux battery and causing the car's
already-running fans to spin up a little bit. If the charger doesn't start
delivering current soon after the car requests it, the car will identify an
error, the error light on the charger will light and the car will exit charge
mode and shut off (or go to the aforementioned paddle-inserted standby condition).
When the car is keyed on after a charge error the charge control panel in
the car will indicate the error.
- Throughout charging the car refreshes SOC info and repeats
the charge request. If the car needs to, it will request a low current charge
for leveling at the end of a charge cycle. The charger will stop charging
for a few seconds, then come back on at the lower current for two hours. One of the many keys that activate this leveling sequence is ten charges to full. Leveling will also occur after the car has been driving until it shuts itself down.
- At the end of charging, the car tells the charger to stop
charging and goes to paddle-inserted standby.
- Presumably if dirt on the paddle or port IR windows or any
other reason caused IR communication to be marginal, the charge process could
work up to a point, then abort due to a comm error.
Q:
Tell me about battery temps, input voltage, power and current during charging.
A: 208V (typically one leg of 3-phase commercial power)
will send about 5.0 kW to the batteries, and 240V (residential) will send about
5.6 kW. In a typical charge cycle from near empty, you will see the current
slowly ramp up to about 17A to begin the charge. The current will fall off as
the pack fills, and just before the pack is full, you will see about 15A (and 15V on the batteries). The
current tapers off because the charging algorithm is keyed to constant power.
If the average battery temperature is over about 100° F, a 208V source may
only let your charger deliver 13.5-13.7A or a lot less than 4KW (this is due
to the power being bled off to run the battery fans on high). If the batteries
are over about 120° F, the charging will be delayed while the fans (using
shore power) come on to bring the battery temps down. Long wire runs to the
charger (10-3 extension cords, anybody?) will lower the voltage available to
the charger and will slow the rate of charge.
Q: Does leaving
the paddle in the charge port cause the Aux battery to run down?
A: No, not that we can determine. The perceived
danger of running down the 12V battery while connected to the charger seems
to come from two sources:
- Leaving an interior light on. Interior lights can be left
on by leaving a door ajar or from switching the light fixtures manually (unless
you prevent this electronically).
- Leaving the key on. This will consume 12V also. You can't
start the car with the key while the charger is connected, and you can't start
charging with the key on, but you can go into accessory mode after you've
started charging. The battery icon lights, to tell you that you are discharging
the 12V battery. Even if no accessories (such as the radio) are actually on,
a fair amount of 12V power is being consumed. Some relays are closed, and
some electronics may be on as well. This will eventually drain the 12V battery.
To date, the tales of the 12V battery discharging while the
car was sitting connected to a charger have been tracked back to one of the
above two circumstances. As the Aux battery ages, we're sure to see more "won't
start" situations. The factory battery is barely up to the job - even Toyota
admits this.
What battery
will work for the Aux?
A: The Aux battery is type 35. The official, higher-capacity replacement battery
is Toyota PN 00544-35060-550, a Truestart battery. Others
have found batteries at Sears, Costco - anywhere that batteries are sold.
Nothing special about the battery - it just has to fit, and the posts have
to be in the proper orientation, same as for the 1996-2000 gasoline version
of the Rav4. One specific option for about $60 is Duralast 35-DL from AutoZone. A second recommendation is for an Odyssey PC1400. I personally replaced my Aux with a Yellow Top Optima.
My old Aux battery tests "OK" - why are some people still telling me to put in a new one to solve a problem I'm having?
A: Because even an older battery that tests "OK" still might not be up to the job of keeping the Rav4EV working properly. Many odd, seemingly unrelated issues in the Rav are due to an Aux battery that is not 100% healthy. Though the Aux battery is charged by the DC-DC converter while the car is running and while it is charging, a less-than-perfect Aux battery can cause the car to "Ready-off" while driving. It can cause a no "Ready-on" situation. It can cause early charge termination. It can cause erratic behavior from the charge timer. In short, an unhealthy Aux battery can leave you stranded in a car that has enough energy in the traction pack to run your house! It appears that Rav4EVs and Aux battery problems will always coexist. The RAV problems are likely due to one or more design defects in the car. Some systems seem unable to tolerate what are perfectly normal voltage fluctuations in a 12 volt automotive battery system.
The 12 Volt Aux battery in the Rav4EV is a starter battery, optimized to start an Internal Combustion Engine. It is designed to occasionally deliver hundreds of amps of current to a starter motor for a short time, then be immediately recharged at a moderate rate. The Aux battery in the Rav never does this, but just supports loads from ECUs and accessories. Holding voltage under parasitic load conditions and over variations in temperature etc is not the forte of a starter battery. An ICE starter motor and all of the electronics and electrics in a typical car need to be designed to operate over a wide voltage range. The Rav4EV designers seem to have missed a few items, or incorrectly assumed that the chosen components would work well enough with the assumed stable Voltage in an EV.
The RAV Aux is basically dormant as far as starter battery service, it never sees a load anything like a starter motor, but is instead apparently called on to do something it was never designed to do - to hold voltage after hours of steady parasitic loads running timers and control circuits.
What may be a great starter battery, built to start an ICE in sub zero temperatures, may be a lousy RAV Aux battery. IMHO the best RAV Aux battery is a cheap one. When it starts getting unreliable in the RAV, put it out to pasture in an ICE car or some other application where it can be useful.
Q: How much energy does the battery pack hold?
A: About 26 kWh
- Pack capacity: ~26
kWh - the amount of energy in about 0.8 gallons of gasoline
- AC power consumption
to fill 26kWh pack: 30kWh typical (approximate 10% charge loss,
and can be ~5kWh more if leveling)
- Average Consumption
from pack: 250 Wh/mile
- Average Consumption
from outlet: 275 Wh/mile (approximate 10% charge loss)
- Charges from 240V
at about 5.6 kW (18% SOC/hr).
- Charges from 208V at about 5.2 kW (16%
SOC/hr).
- Charges at 15A, 4.9
kW into the batteries (from 208V 3-phase commercial power). About
15% SOC per hour
- 1 kWh = 3412
BTU
- 1 gallon of gasoline
~34 kW
- 1 US gallon of gasoline = typically
115,000BTUs (source: http://www.chevron.com) which is 33.7 kWh
From http://www.fueleconomy.gov
(EPA):
- 2001 RAV4EV 290(city)-370(highway) Wh/mi and 104mpg combined equiv.
- 2002 RAV4EV 270(city)-340(highway) Wh/mi. and 112mpg (equiv.)
From the DOE http://www.fueleconomy.gov/feg/bymodel/2002_Toyota_Rav4.shtml
- Wrong image, and wrong numbers!
Q: How much current
does this thing draw/generate?
A: Rough (and variable) measurements:
- Idle current of car = 0.3A (can go as high as 1.7A when
coolant pump and fans run)
- Pack voltage right after after charge to 100% (no leveling)
is ~350VDC, dropping rapidly
- Charge current is 20A @ 335VDC
- Full throttle current = 225A then drops to 206A and stays
there
- EB regen current @ 40 mph = -26A
- B regen current @ 40 mph = -80A
- B regen current @ 60 mph = -122A
- AC on current is ~ 3A (quite variable)
- Heater on current is ~3A (quite variable)
- HWS current is 2A
- Headlight current is 1A
Real World driving:
- The Rav consumes about 11-12 KW to maintain 60mph indicated
on the flats - that equals about 16 Horsepower.
- Most drivers report that on a flat, windless stretch of
road, an indicated 60mph (about 56mph actual) equates to 100 miles of range.
- At 45mph (indicated), I have calculated almost 150 miles
range.
- Every 1000' of elevation consumes an extra 6-7% SOC. And
if you return to your starting elevation, all but 2-3% of that SOC loss
can be replaced.
The DC-DC converter is capable of about 1200W. Should be
enough to support 1000WAC load if using an inverter off the 12V battery with
the car in READY mode.
Q: How do I
reset my SOC meter and force the pack to level?
A: For unknown reasons, the internal SOC meter in the Rav can sometimes get
confused and show up to 35% SOC on the gages (analog and Rav4INFO) while in
reality, the pack is completely discharged! In this instance, you are not
warned with the charge light, the turtle or anything. No reduced performance,
just a complete vehicle shut down. Power cycling will get it going again,
but not for long! To reset the meter, and rebalance the pack, the car needs
to be charged to 100%, left to self discharge at least overnight, and have
the process repeated for at least three cycles (better to go five or more if
possible).... all without driving the vehicle in between cycles. After doing
this, it is best to drive the car down to under 5% SOC to be sure you have
your full range again before you NEED it.
Q: What does Rav4INFO tell me about my battery health? Tips and Tricks? Mounting Options?
A: Lots of stuff! See the page here
Q: What are some of the common charging problems and their solutions?
A: As our cars age, we are discovering more frequent charging issues. These issues seem to boil down to one of three main (and correctable) problems with the car. In short, the problems are usually: Input capacitor, charge port fan, vent screens or AUX battery. The final point discusses the bad charger. Below, I have listed these five common situations.
- The car charges for less than 30 seconds and shuts down with "error" displayed in the car (and the red error light showing on the TAL, or error E1 on the Gen2+). This is typical of a bad input capacitor. This capacitor is not sold through any official channels (certainly not Toyota!) The good news is that we now have availability of new units that are even better than the original spec. These are available from the famous Michael Schwabe who commissioned them to be built to his specs to be a direct drop-in replacement. To find out how to fix the problem, see here.
- E2 error (on Gen2+).
1. Check charge port fan. Cooling for over temperature condition.
2. Check charge cap. condition in controller housing.
3. Check rear vents.
4. Check two rear tray fans - clear & operational
5. Check all tray air outlets for air flow.
6. Check aux. batt. voltage. Key-off, key-on, and charge-on.
7. Rav4info --- a) check high-low-avg. voltages while charging, expect >10v and <15.5v --- check batt. temps while charging, expect below <120F.
8. OBD-II review --- a) check for DTCs, b) check for paddle receiver temp, c) check for traction batt. resistance levels and variances.
9. Check charge on a different charger, Gen2+ & TAL as possible
- The car charges for a significant amount of time, and then shuts down before 100%. Charges for less time in high ambient temps than when it is cold. Paddle will be blistering hot when removed right after charging stops. This is typical of a charge port fan failure. First thing to do is have a look down in the charge port (with a flashlight) to see if there is any debris at the bottom, blocking the fan blades. You should be able to spin the fan blades with a long, narrow stick. If there is crud in there, clean it out (compressed air, vacuum) and remove the rear fan guard to prevent having the stuff stick in there next time. See here, and you may very well be good to go. If it turns out that you need a new fan, again there is limited supply of the original issue fan (contact me for that info). And the same fan but without the super-high environmental seal rating is available for quite a bit less money (see the page listed above). In the meantime, if you have to charge while waiting for an ordered fan, just trickle some water (doesn't take much - water is WAY better than air at transferring heat!) through the charge port while you charge. Try to get it over the top of the paddle. You can also set up a desk fan to blow into the port. When the paddle is inserted for charging, you should be able to hear that little fan spool up if you put your ear right to the port (try to ignore the battery and charger fans)
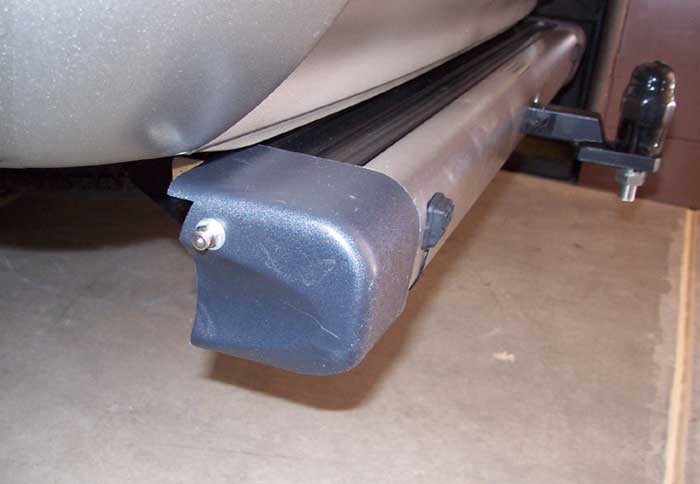
- Similar item (2), the car charges for a significant amount of time, and then shuts down before 100% is reached. Charges for less time in high ambient temps. The paddle is NOT blistering hot when removed right after charging stops. In this case, I would suspect clogged vent screens - the screens that filter the large volume of air that enters the rear quarter vents to cool the battery pack. These can get clogged with hair, dust, leaves, small rodents (no, really!). These screens should be inspected once per year at a minimum. Best to modify the vent covers to make them easy to remove. See here where I detail how to convert the single-use clips to magnets.
- The car won't start charging after setting the charge timer, or any other un-explainable anomaly that seems illogical. REPLACE THE AUX BATTERY. This has solved more crazy problems that I can count. And yes... even if you have already replaced the Aux once, it could easily need it again. I am on my second new one in six years. And both times I replaced the battery, it solved the problem I was currently experiencing. Very little is demanded of that Aux battery, but it is subject to consistent, small draws that add up. Especially if you use the charge timer. And the car apparently expects that battery to be *completely* healthy to perform its tasks. Yes, some folks have managed to never replace the Aux in all this time. But they are few and far between. It isn't a matter of IF you will be stranded when the Aux suddenly can't perform - it is WHEN.
- And finally there is the bad charger. You can try bending the paddle cord a bit right where it enters the paddle. You can try inserting the paddle a different direction. You can try test/reset. And you can even fiddle with the delay timer button (see the instructions for the various chargers on my charging pages, or on the EVCN site). The easiest way to determine if the charger is at fault is to try another charger!
Q: What is "short charging" and what are the benefits and drawbacks?
A: Short-charging is a term invented by Toyota, and describes what some of us do to purposefully prevent a full charge. We either physically pull the paddle out early, or set the HVAC system to stop the process at a given time. For some reason, Toyota blames the use of Rav4INFO (which they usually describe as a "Palm Pilot"). There is an application for the palm that helps you calculate the times to set for automatic charge termination, but the device and software don't perform any of the tasks involved. Blaming Rav4INFO is as relevant as blaming my wrist watch. Anyway, there has been no evidence that avoiding a full charge harms the batteries in the Rav4EV. There is also no evidence that *any* NiMH batteries are harmed by not being charged to full. In fact, all evidence is to the contrary: Charging to full (and leveling) creates significant heat, and that heat is detrimental to battery life. Obviously this is especially important during the hot summer months - and is the time when I cannot bring myself to let the high battery temperature terminate the charge process early (Yes, the car will terminate the charge early when it determines that the batteries are in danger - this termination is apparently acceptable to Toyota, while manually avoiding that over-heat situation is not). There are just not enough sensors in the battery tray to safely determine when any of the batteries has reached a dangerously high temperature. When my garage is at 110°, I'm not going to charge the car to full and harm my battery pack. Simple as that.
What *can* happen with short-charging: The pack doesn't get ballanced. And the SOC meter may become confused. So the car might be full, and only indicate 80% SOC. Or the pack might be at only 80% while the car indicates 100%. Or, most commonly, the battery pack might be at 0%, and the car still indicates 10 or 20 or 30%. Because of this situation of confused SOC, it is possible to drain your batteries completely - without realizing it - because according to car, you have plenty of charge left... but the batteries know otherwise. This has the potential to leave you stranded, and can be stressful to the weaker batteries. This is where having Rav4INFO is crucial. When the high and low battery voltages suddenly start to vary widely (this means bigger delta than 0.3 or 0.4V), you are empty. When the lowest battery dips to 10V or below (even when the average may still be at 11V or above) you are empty. Without Rav4INFO, the gauge on the dash may still be indicating in the green, and the V needle may also look healthy. But the fact is, the car is "empty", and the car is not reporting correctly.
There are only two ways that have worked to fix this confused SOC situation. The SOC reset procedure is is to charge to full, let the car self-discharge at least 5%, then charge to full, let it self-discharge, etc without driving between. Do at least three cycles. Five is considered better. Doesn't always work, but if it does, you've saved yourself lots of time, aggravation and money. The other way is to have the EV tech reset the SOC manually with their special tool. The problem with this method is that the EV tech is given no official instruction on how determine 0% SOC, and it is left up to his experience and skill - not a repeatable process in most cases! I can tell you that the technique works, but now zero is where the tech thinks it *should* be, and the car works with the new parameter. Why the car isn't capable of resetting itself is a mystery to me. How it gets confused in the first place is is also a mystery. There are many Rav4EVs out there that are charged to full every day, and they still get confused SOC meters. There are cars that are almost never charged to full, and their SOC meters remain accurate and reliable. Toyota calls this rock-solid evidence that short-charging causes the confused SOC issue. In fact Toyota goes the next step to claim that short-charging causes battery degradation. Yet none of this is clearly the case.
Toyota claims that not charging to 100% every time voids the warranty. Well, since none of us are under warranty any longer, I guess we don't have that to fear any longer. What's nuts is how much energy is wasted in a typical full charge (that Toyota claims is required for the car to operate properly). If you charge to full every evening (let's say when you come home from work at 6pm), when you drive off in the morning, you are at approximately 95% SOC due to self-discharge - often lower. Add that up for a month. Five times per week for four weeks times 5% loss. Being conservative, every month, you are throwing away one *complete* charge of your battery pack. What did you get for it? More wear on your battery pack (from having to recharge that 5% extra every day, and the degradation aspect of the battery heat), you have heated your garage, and for those of you without solar, you have paid for that extra full tank every month. Can you imagine the response to telling the motoring public that every month they are expected to toss one tank of gas away?
Q: What happens after I get a "refurbished" pack from Battery MD?
A: You receive a document like this that spells out what to expect.
Q: What Toyota
parts/accessories will fit my 2002 or 2003 Rav4EV?
A: Many of the factory accessories from the model year 1996-2000 gas model Rav4
will fit our vehicles. Here are some Toyota parts and accessories that we KNOW
will work:
- Bumper Hitch
(002284296203) (may require shortening of the receiver tube by 1/2" to
clear the spare tire) $220
- Console Armrest w/cup holder (PT266-42961-03)
$70 (see below for current PT's and prices)
- Console lid Lid (PT413-42992-LC) about $130
- Box with instructions, hardware and crappy insert (PT413-42992-CB)
about $110
- Roof Rack: (PT444-42000) superceded
by (00444-42963) $150 (no longer made, VERY limited availability)
- EV floor mat (PT206-42020-11) (no longer available, apparently)
- Cargo Cover (PT202-42970) $49.00
- Cargo Net (00420-42960) $35.00
- Back Door Bags (PT218-42980) $149.00
- Front Cup Holder (PT547-42970)
$35.00 (probably the most-used addition in my car)
- Truestart 12V Aux battery (00544-35060-550) - this is the
factory battery... get something better!
- Heated Windshield (PT56111-42090)
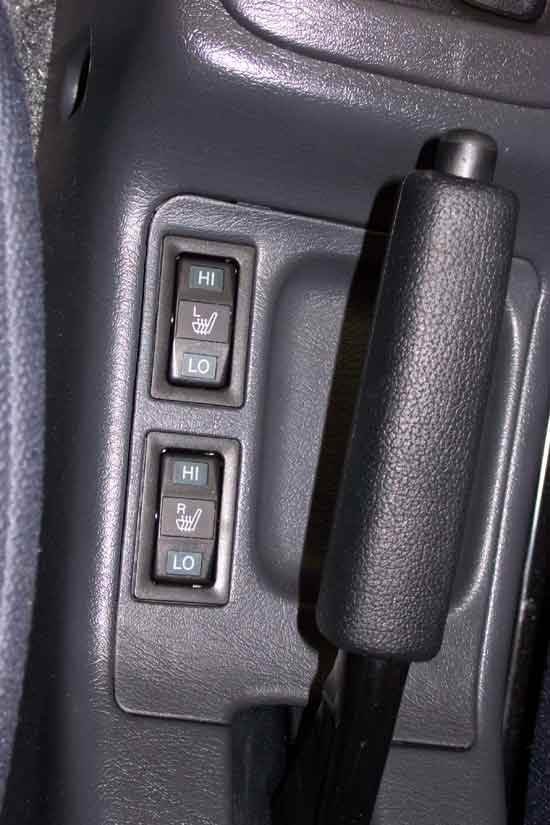
- Switch, Rear Seat Heater (2002): 84751-42010
-
Switch, Front Right Seat Heater (2002) 84751-20140
- Switch,
Front Left Seat Heater (2002) 84751-20130
- Windshield Wiper Blade, Driver - (PT
85212 YZZ07) (500mm, about 20")
- Windshield Wiper Insert, Passenger - (PT
85223 YZZD5) (450mm, about 18")
- Rear Wiper Insert Blade, Rear - (PT
85212-YZZ14) (350mm,
about 14")
- Input capacitor specs: 1600WVDC
0.04uF (2-7/16" square x 1-3/16" deep, with two 9/16" square
terminal tabs, with 1/4" x 3/16" oval holes).
I have also added aftermarket accessories that work well:
Q: Why can't
I set Pre-AC or Time Charge to start 30 minutes from now?
A: For unknown reasons, there is a black-out period of 45 minutes from the current
time. If you attempt to set Pre-AC or Time Charge for
any time that is within 45 minutes of the current time, the indicators over
the relevant buttons on the charge controller (Pre-AC or Time Charge) will not
light, and will not function. Nobody has yet found a way to circumvent this
"feature" so the only fix is to be sure and set the delay for at least
45 minutes from the present time.
Q: What
is the proper tire pressure, and why so high?
A: The official tire pressure is 44psi for all four tires.
This is higher than most passenger cars because the Rav4EV uses specialized
Low Rolling Resistance (LRR) tires. The higher pressure assures proper performance
and life from the tires. I personally run 46-50 psi in my tires. The compact
spare (exterior, under the cargo floor) requires 60psi. The tire pressure can
only be checked and adjusted by lowering the tire from the cradle (unless you
flip the spare, or add a remote
tire valve). The pressure in the spare should be checked at least every
six months - and I would not count on the scheduled six month service to keep
on top of this. My car was delivered to me new with about 30psi in the spare.
Q: What low
rolling resistance tires came on the Rav4EV?
A: The Ravs were shipped with one of two different types of tires:
- Bridgestone Ecopia EP-02. Wear rating: 360
(195-80 R16, 739 Revs per mile, 44PSI, 20 lbs, 1609 pounds rated).
- Yokohama EF1 (or E102, the latest designation for the same
tire). Wear rating: 300.
Can be purchased at Tire Rack. (These tires went out of production in late 2004, and returned to limited production in 2007. You may want to inquire as to the production date code on the sidewall before ordering).
At one time, the Yokohamas could be found here for an astonishingly
low price of $36 (plus $25/tire shipping): Tires-Easy.com. Deal seems to be over
now.
In my experience, the Yokohamas wear better and provide better
traction. Others have had the opposite experience, so you're pretty much on
your own with that choice! Regular (non-LRR) tires of the same size will work
just fine, at the expense of some range. Some good info on LRR tires here.
Torque for wheel nuts is 76 ft-pounds.
Q: Can I
use regular tires on my EV?
A: Yes, though your range will be somewhat reduced.
Several Rav4EV owners have begun to use more "standard"
tires once the expensive LRR units wear out. I have heard of no downsides to
doing this, except for mildly reduced range. Regular tires should be cheaper,
provide a more compliant ride, and should wear longer.
Some options reported by Rav4EV drivers:
- Bridgestone B420 215/65 R16 (32.25 pounds
total mounted on wheel) for about $90/tire (Apparently the B420 is no longer
sold and current equivalent Bridgestone tire is the Insignia SE200).
- Dunlop Rover AT 215/70 R16 (replacement
for the gas Rav of the same year). Range reduction for this tire was noted
to be "about 20%."
- General Grabber UHP 215/70 R16. Tirerack,
just $68 each. Max inflation of 51 psi. Load rated at 1764 lbs. Handling is
apparently vastly improved. Owners report that over inflating by 10% returns
equal range to stock LRR tires. Info on these tires here (please copy/paste
into your browser, as a link won't work): http://www.tirerack.com/tires/surveyresults/surveydisplay.jsp?type=SST
*and* http://www.tirerack.com/tires/tires.jsp?shipquote=N&tireMake=General&tireModel=Grabber+UHP&x=18&y=11
- General AMERI GS60s, 215/70 R16. Similar
Revs per mile, decent load rating, great tread rating, almost twice the useable
tread depth. Seem quieter. Rated for 44 psi instead of the 51 of the Grabbers.
No loss of range yet noted after 200 miles.
- Michelin 4x4 Synchrone 205/80 R16. Reported
"little to zero range loss." A bit harsh at 50psi, otherwise, smooth
and comfortable. Quieter than factory tires, but slight "whirr"
at 25-30mph. One report of rubbing the inside of the fender wells at full steering lock.
- Goodyear Integritys 225/60 R16 (this tire
comes from the factory on the 2006-2007 Prius)
- Michelin MXV4s 225/60 R16
- Continental CrossContact LX 215/70TR-16 (great
wet-weather performance, no significant range degradation with 44PSI. Comfortable
and quiet).
- Avon Ranger TSE
- For snow/ice: Nokian Hakkapilletta 5. If there is lots of ice, then get them studded. Available in 215/70R16 (OEM size for gas RAV 2wd) or 225/70R16 (almost identical diameter as OEM size for EV: 195/80R16).
Q: What are
the wheel alignment specs?
A: From the 2002 shop manual (pages SA-5 through SA-9):
Front:
Camber: -0°19' ± 45' (-0.32° ± 0.75°)
....LR error: 45' (0.75°) or less
Caster: 1°36' ± 45' (1.60° ± 0.75°)
....LR error: 45' (0.75°) or less
Steering axis inclination: 10°31' ± 45' (10.52° ± 0.75°)
....LR error: 45' (0.75°) or less
Toe-in: A+B -0°04' ± 12' (-0.07° ± 0.2°)
....Toe total: C-D: -0.6mm +/- 2mm (-0.02" ± 0.08") (Distance
between front of tires minus distance between rear of tires)
(Note: Front camber adjustment is not possible. Unless... You purchase and install one of these:
Model TC116 Triple C bolt.
$50 From Amazon
Rear:
Camber -0°50' ± 45' (-0.83° ± 0.75')
....LR error: 45' (0.75°) or less
Toe-in: A+B 0°06' ± 12' (0.1° ± 0.2°)
....Toe total: C-D 1mm ± 2mm (0.04" ± 0.08")
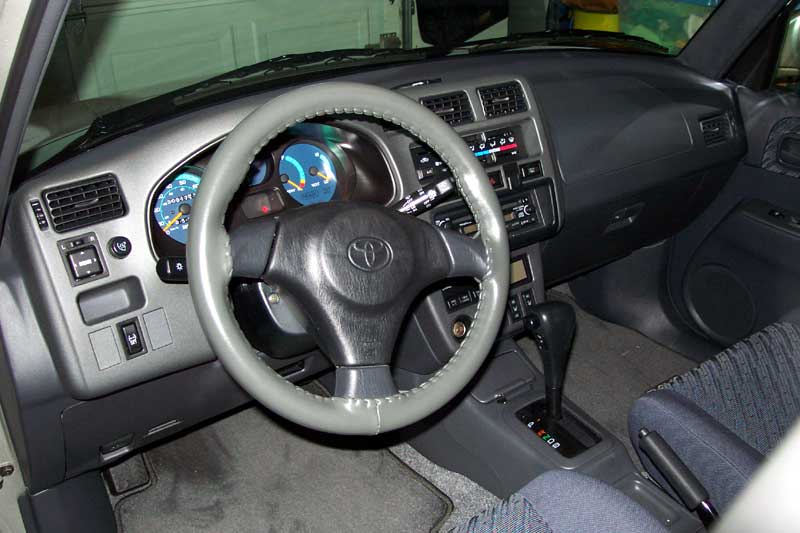
Q: Is my speedometer
showing my actual speed?
A: Probably not. Toyota's official stance is that the speedo
can read about 9% high, and still be within their tolerance. In my experience,
the speedo in all of these cars reads about 4mph high at freeway speeds. An
indicated 60mph is actually 56mph. That 4mph difference can make a substantial
difference in range. The good news is that it makes it a wee bit easier to drive
slower if you THINK you are going faster. Here are the specs from the service
manual page SS-21 in MPH.
| Actual speed |
Allowable indication |
| 20 |
18-24 |
| 40 |
38-44 |
| 60 |
58-66 |
| 80 |
78-88 |
| 100 |
98-110 (higher than speedo reads) |
Q: Are there
any repair or service manuals available for the Rav4EV? Where can I get them?
A: Yes, there are official sets of Rav4EV repair manuals for
the various years:
2001
- Repair RM845U
- Wiring EWD446U
2002
- Repair RM892U
- Wiring EWD467U
- Owners OM42515U
- Warranty Book 00404-02002-EV
- Scheduled Maintenance Guide 00400-02002-RAV
2003
- Repair RM1003U
- Wiring EWD516U
- Owners OM42516U
- Warranty Book 00452-02003-EVOWI
- Scheduled Maintenance Guide 00452-02003-EVSMG
They can be found here: ToyotaWorld
(choose Rav4EV - only 2001 manuals listed here as of this writing)
They were once available by calling the Toyota Material Distribution
Center in Rancho Dominguez, CA. 800 622-2033. I paid $48 for the Electrical
Manual and $92 for the Repair Manual - however several callers have now been
informed that the manuals can only be purchased through dealers now. And recently
even some dealerships are saying that the manuals are not available to end
users.
Another option for the manuals is to visit techinfo.toyota.com
and subscribe for 24 hours for $10. Do it on Saturday morning, and you will
have two full days to download files. For a fully linked manual, download
each file and place it into a folder hierarchy that matches the link itself.
You will have to create folders as you go. When you are done, however, you
will have pdf's with hotlinks in them that link to other sections of the manual.
Don't forget the electrical wiring diagram and the wiring repair manual under
the body repair section. TSB's and Campaigns are also of interest. All of
this can be had for $10 and a few hours work.
Q: What are
the paint codes?
A: This isn't as simple as you would think,
and you apparently can't trust the dealership to figure it out!
- White RAVs: Body (metal) = 040; Bumper (Plastic) = 1B9
- Silver RAVs: Body (metal) = 1C0; Bumper (Plastic) = 1B9
- Paint code 040 P/N = 00258-0004021
- Paint code 1C0 P/N = 00258-001C0
- Paint code 1B9 P/N = 00258-001B921
Q:
What maintenance needs to be performed?
A: Toyota wants to see the car every six months.
The service visit consists of rotating the tires and checking the OBD2 port
for error codes. Eventually some fluids are checked and changed as well. For
the first three years of lease/ownership, the six month service is provided
at no extra charge (every dealer seems to finally know this, now that we're
all coming up to our last service!).
Q: Why does the
Rav "shudder" or "cog" at low speeds?
A: All permanent magnet motors want to naturally
cog at low rpm. Vehicles like the EV1 used electronics to
eliminate the cogging for near-perfect smoothness plus the EV1 does not use
a PM motor. Toyota did not bother to attenuate the cogging on the Rav, so you
get to feel exactly what the motor wants you to feel.
Q:
How do I stop the brake squeal?
A: The cheapest and best solution is to install proper aftermarket pads, and use anti-squeal grease on the back. For some reason, Toyota's official fix at one point was to switch to more traditional
iron rotors (on the 2002 that came with Al rotors). Here is my page on the brake job.
- Official Toyota part: Toyota Pad
Kit, Disc Brake PN: 04465-42041
- Aftermarket options:
- The RAYBESTOS
PGD562QS (~$45) are specifically indicated for the 1999 Rav4EV with Al
rotors. They also fit the Camry. (specify
1999 Rav4EV, and you are looking for the 562 pads).
- I have also heard great things about the premium ceramic
Akebono replacement pads (sold through many auto parts stores).
- Vortex VSD562 by Ferod. About $48.
- Performance Friction Corporation PFC 0562.20 - high performance carbon metallic pads.
- Altrom D784DP
Q: What are the wheel bearing parts (and prices paid)?
A: List of bearing parts and Toyota numbers, followed by amount paid in 2008
- 42450-42010 hub & brg assy 214.25
- 90369-43009 bearing 87.27
- 43502-44010 hub sub-assy 105.81
- 90521-88001 ring, hole snap 9.58
- 95381-04028 pin, cotter 1.82
Q: Best rear shocks?
A: Do yourself a favor and skip the OEM replacments. For about the same price you can get higher-quality with a lifetime guarantee. Some drivers have had great luck with KYB Gas-A-Just Shock Absorber, model: KG4738. A pair should cost about $75. Many sources can be turned up with google. (easier than posting links that go out of date so quickly!) First I put on factory shocks, then the KYB Gas-A-Just
Q: Replacement Front struts?
A: The front struts are serviceable. So, you can replace the insert without replacing the housing-arm. The housing arm is the same as the Gas model.
After Market: KYB:
KYB Gas-A-Just Shock Absorber, model: KG4738
KYB 334242 GR-2 Strut
KYB 334241 GR-2 Strut
KYB SM5162 Strut Mount x2
KYB SB103 Strut Boot x2
Bilstein:
Front insert
Rear Shock:
Here are the Toyota OEM Parts Numbers:
48131 SPRING, FRONT COIL, RH
48131-42230 L=346.5 1
48132 SPRING, FRONT COIL, LH
48131-42230 L=346.5 1
48510 ABSORBER ASSY, SHOCK, FRONT RH
48510-49136 1
front right OEM shocks Replaced by: 48520-49137 48520 ABSORBER ASSY, SHOCK, FRONT LH
48520-49136 1
front left OEM shock Replaced by: 48520-49137 48811 BAR, STABILIZER, FRONT
48811-42030 1
48231A SPRING, COIL, REAR RH
48231-42090 1
48231B SPRING, COIL, REAR LH
48231-42090 1
48530 ABSORBER ASSY, SHOCK, REAR RH
48531-49155 1
48540 ABSORBER ASSY, SHOCK, REAR LH
48531-49155 1
Rear Door Upper Same as all the other Rav4s!!
63134A FRAME, BACK DOOR OPENING, UPPER
63134-42010 1
48811 BAR, STABILIZER, FRONT 48811-42030
Q: What
are the differences between model years 2002, and 2003?
A: Here are the only items that each model year has that the other model year
lacks:
- 2002: Heated windshield (HWS), heated
seats, rear speakers, aluminum brake rotors, original inverter, plastic
covering on A pillars
- 2003: LATCH system in rear seats (for child
seat attachment), steel brake rotors, modified inverter, strengthened A
pillars with fabric covering.
Q: What is the
Rav4EV lacking (I mean, besides an engine, gas tank, exhaust, pollution, etc)?
A: My opinion only, of course:
Q: How many
Rav4EVs have been on the road?
A: Fleet numbers:
- 1997 - 69
- 1998 - 359
- 1999 - 255
- 2000 - 106
- 2001 - 160
retail numbers:
- 2002-2003 - 238 leases and 101 purchases = 339
total
- VIN 2818, the last of the retail Rav4EVs was sold on September
14, 2003.
Q: Specs of
the Rav4?
A: RAV4-EV:
dimensions: 156.7"long, 66.7" wide, 64.4"
high
(Volvo 3CC proto: 153.5" long, 64.0" wide, 52.0" high)
(EV1: 169.7" long, 69.5" wide, 50.5" high)
weight: Rav4EV (2002) 3440 lbs curb
GVWR 4316 lbs (4266
lbs for 1998 version of the EV)
GVAR Front: 2258
GVAR Rear: 2297
Max load 825
(Rav4 gasoline
(2000) 2668 lbs curb)
(Rav4 gasoline
(2000) 3946 lbs GVWR)
motor: 67hp, 50kW peak, 20kW continuous, 190nm (140 ft-pounds) torque
traction battery pack capacity: ~27kwh (more battery data,
and traction pack pictures).
Reliability
Report (So. Cal Edison)
Q: What was the
warranty for the Rav4EV?
A: The basic "bumper-to-bumper" warranty is for 36,000 miles (or 36
months, whichever comes first). The traction battery warranty, the power train
warranty, the EV-specific parts warranty, and the restraint systems warranty
all last for 60,000 miles (or 60 months, whichever comes first). The rust-through
warranty is for 60 months, regardless of mileage.
The EV-specific parts warranty covers the traction motor, motor
revolution sensor, motor control inverter, ECU, unit controller fan, accelerator
sensors, shift position switch, IG control relay, battery ECU, blower assembly
for main battery, battery sensor computer, ground fault detector, system main
relay, motor mounts and seals, and the transaxle, transaxle seals, mounts, and
gaskets, and the front-wheel drive system -- the final drive housing and all
internal parts, axle shafts, constant velocity joints, front hub, bearings,
seals and gaskets. (Warranty booklet, page 9.)
The warranty is automatically transferred to subsequent owners.
The last warranty will expire on Sept 15, 2008 - five years after the last retail
Rav was placed.
Q: What
happens now that the warranty is expired?
A: Well, we're on our own. Just before they all expired, Toyota was warning us about the high
prices of all the components though. Undaunted, we soldiered on.
Q: Who should
we contact to alert Toyota that we want more EVs and/or PHEVs? (Plug-in Hybrid
Electric Vehicles).
Yukitoshi Funo-sama ( yuki_funo@toyota.com)
U.S. Corporate President
Toyota Motor Corporation
P.O. Box 2991
Torrance, CA 90509
Q: Where are
the official Rav4EV dealerships?
A: All 25 listed here.
Q: What was the
price of these things again?
A: Original purchase price (before incentives): $42,510
plus tax.
Total cost of ownership (before incentives) if purchasing vehicle after three
year lease
$23,144.76 + 26,815 = $48,195.76 plus tax.
There was a $9,000 state (ZIP I) incentive (paid $3,000 over three years) and a one-time Federal tax credit of $4,000. For a total of $13,000 of incentive possible over three years for a theoretical net cost of $29,510 + tax on the $42,520 if purchased originally.
Q: Why were the cars
eventually sold/leased to individuals in 2002-2003?
A: In late 2001, a Toyota official speaking to a large
EVS audience, stated that nobody wanted to buy a Rav4EV no matter how hard Toyota
tried to sell the vehicle. Greg Hansen was allowed to make the point that the
vehicle had never been available for sale to the public - only as business
leases. In March 2002, the first retail cars were being delivered to individuals
(for purchase or lease). Though the approximately 300 vehicles built for the
retail program were expected to last for 24 months, every car was placed by
the end of November 2002, and the program was terminated early. The official
reason for ending the program was "lack of demand."
Tips
and Tricks
- Check SOC without key:
Press charger timer button on console (display will light up "CONN").
Turn on Rav4INFO and it will display the last SOC that was reported.
- Check Aux Battery V at rest: Without
"starting" the car, turn the key to the ON position. Turn on Rav4INFO
and tap the battery temps to get to the second screen. The small number to
the right of the speedometer is the Battery Voltage.
- Stop charge before 100%: (Although the car will terminate the charge early if it detects too much heat in the battery tray, Toyota does not recommend ever manually interrupting the charge cycle). Figure
out what time you want the charge to stop, add 15 minutes, and set the
precondition timer to that time. Charge timer can also be set to
delay start, or use -:-- for immediate start. Both the Charge Timer
and Pre AC buttons need to be pressed and lit. Set AC controls to Demist,
no fan, temp anywhere. 15 minutes before the preset time, the car will stop
charging to attempt Demist - which does nothing. The charge process ends
permanently. Click here for instructions on how to set the
Charge Timer for Pre A/C. For the Palm code that does the time calculations
for stopping the charge at a chosen SOC:
You need to download and install two files:
http://www.evchargernews.com/miscfiles/rav4evcalc.prc
http://www.evchargernews.com/miscfiles/mathlib.prc
Install these files on your Palm via HotSync, just as you
would install any other program. The files can also be beamed from another
Palm device. You might already have the mathlib.prc file for some other
reason, but it won't hurt if you download it again.
- Stopping on hills: The motor can
be preloaded when the brake is pressed. If you stop on a hill, and don't want
to drift back, use your left foot on the brake. As you add throttle with your
right foot. Release the brake, and you'll have some forward power immediately.
- Passing wires through the firewall: We
haven't found a great way to go directly through the firewall, but there is
a route that works well. From the motor compartment, a wire can be fed
through the hole that leads to the fender (either side). And with the
plastic wheel well protectors removed, the wire can then be fed into the passenger
compartment through an existing grommet.
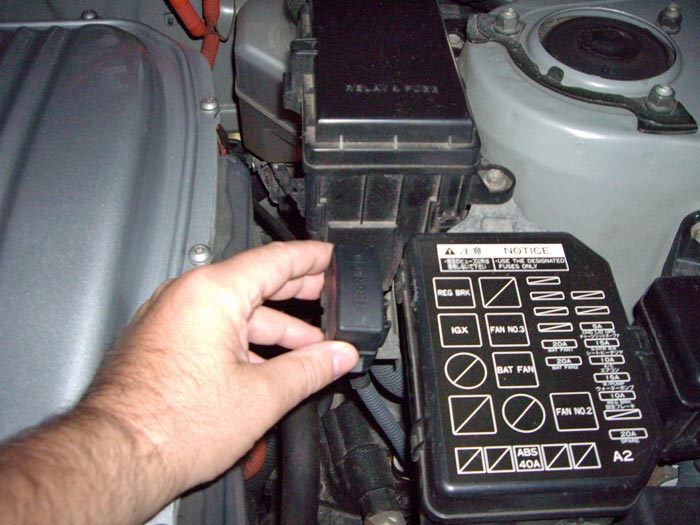
- Finding 12V::The easiest way to
find switched 12V is to use the existing 15A lighter circuit. The easiest
"always on" 12V I have found is the 10A brake circuit. Both of these
can be found in the fuse panel at the driver's left knee.
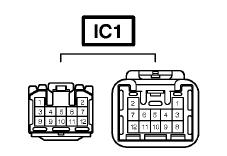
- Finding 12V source only hot when in reverse: Beyond tapping
into the reverse light wires, 12V can be found at pin 11 on connector
IC1 (connector is likely white in color) located behind the left driver's
kick panel, near the bottom. Pin 11 wire is Red/Black (Red with a Black stripe).
You may attach to either side of the connector. IC1 is shown here:
Q: How to get rid of must/moldy AC smell?
A: Spray Lysol or Ozium disinfectant directly into the "recirc air" intake opening located on the blower motor housing (under the dash/glove box on the passenger side). With the air inlet placed on the return air (versus fresh air position) and blower set on MAX speed. The disinfectant will then be directly ducted into and around (at maximum concentration and saturation), the A/C evaporator fins (where all the smelly/offending organic crap lives).
Q: How
do the Heater and AC controls work?
A: Below is the executive summary of the function. Fan on for all situations.
With AC button NOT manually activated:
- Warm conditioned air in red zone (no indicator light)
- Unconditioned "ambient" air in blue and demist
zones (no indicator light)
With AC button manually activated:
- cool (dehumidified) conditioned air in blue zone (indicator
light on)
- warm conditioned air in red zone (indicator light off)
system chooses temperature in demist zone (indicator light
on)
** Dehumidification only available with AC button on and in cool or demist
zone. **
Note:
Even though the fan switch is on, fan action may be delayed
up to a few minutes in the red and demist zones until the system has reached
operating temperature.>
In the demist zone, with the AC button manually activated,
the indicator light may be delayed up to a few minutes until the system
has reached operating temperature.
In demist mode, incoming air is first cooled (dehumidified)
and then warmed appropriately. Output temp is chosen by the climate control
system.
When the slider is all the way to the left (upper registers only) the
center dash vents will blow ambient air when the heat is on. All other
positions will blow conditioned air out the chosen vents.
Q: When does the coolant pump run?
A: The water pump is switched on/off by relay R/B No6 (relay box in under the hood, left front) and is supplied from a 15A fuse (in a fusebox next to the relay box). The water pump relay (pin 1) is controlled by the EV Control ECU. It turns the water pump on if:
- EV motor inverter temp. is above 50°C (122°F)
- EV charger temp. is above 45°C (113°F)
- DC/DC converter temp. is above 70°C (158°F)
Q:
How to reset the Low Tire Pressure warning light?
A: TIRE PRESSURE WARNING SYSTEM INITIALIZATION
In case of having the tires or wheels replaced, be sure to perform the system
initialization.
(a) Inflate all four tires properly.
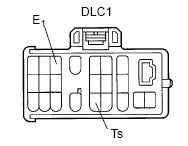
(b) Using SST (or a paperclip), connect terminals Ts and E1 of the DLC1. (SST 09843-18020)
(The DLC1 is located under the hood (see below). It has a little flap cover that snaps open.
Use a piece of wire with hard pins on the end (a paperclip will do!) to jumper
Ts to E1. DO NOT SHORT OTHER PINS! - (unless you follow the instructions below for the charging error codes).
(c) Turn the motor switch ON (not READY) and push the tire pressure warning standardization
switch ("SET" switch).
(d) Check that the tire pressure warning light blinks 3 times and it goes off
then.
Q: How to read charging error codes without using the official Toyota OBD2 reader?
A: Open the hood and locate data link connector #1 or DLC1. (being held by hand below). It has a small, black plastic cover that unsnaps from the front and swings to the back.
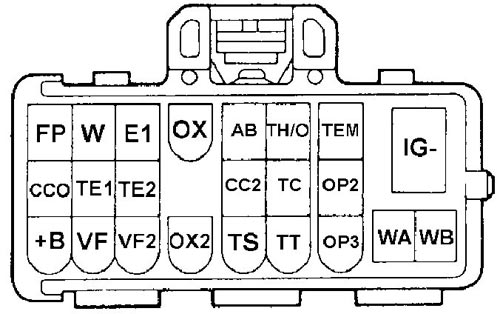
Make sure the car is off, then bend a metal paperclip into a U shape, use it to connect pin E1 with TC. See image below. Make sure not to connect any other pins as this may result in an expensive malfunction.
Have paper and pen ready, climb in behind the steering wheel with your key.
Do not start the car (Ready), but turn the key only to the "on" position. Any charging DTCs present in memory will now show in the charge panel display. Some other DTCs in memory will display by how many times the malfunction indicator light (red car icon with exclamation point directly below Ready light) flashes. For example DTC 85 would display as eight flashes followed by a one and a half second delay, then five more flashes. Don't worry if you miss some codes. After flashing every code in memory (many are the same over and over), it will pause for several seconds then start all over again. There is a 2.5 second pause between codes and a 4.5 second pause at the end of the cycle. Flashing on and off quickly (0.26 seconds) means no codes present. Starting on page DI10 of the Toyota Repair Manual for the 2002 Rav4EV are DI codes that I *assume* match up with the flashing sequences. (can anybody verify?)
To clear the codes: With the jumper between E1 and TC on the DLC1 connector and the car on, you turn the EB switch on the shift lever ON/OFF 3 times or more within 5 seconds.
Q: Why are the ABS and Tire Pressure warning lights both lit?
A:
We have a theory that the ABS system needs at least one working brake light bulb to provide a path to ground in order for the controller to sense the pedal switch. Check and replace all three brake bulbs as needed.
Q:
Know any tricks for maximum range?
A: Yes. Drive downhill and down wind... both ways. But seriously, here are some
tips to remember:
- Drive slower!
- Keep windows rolled up when driving at speed.
- Accelerate slo-o-owly.
- High amperage draw wastes energy as heat in all current-carrying
components, including the battery. The waste increases with the square
of the amperage. A lighter foot translates into less wasted energy.
- Maintain constant speed - decelerate & accelerate
gently, and only when required.
- Choose a speed slightly below the flow of traffic (right
lane!) so fewer speed changes are required.
- Predict traffic changes far ahead.
- Coast (freewheel) down to a lower speed when needed and
when safely possible. (The only way to truly coast above 60mph is to leave
the shifter in D. If moved to N, some regen will be added to prevent gear
chatter. Below 60mph there is no difference.)
- Use cruise control
if you find your speed creeping up every time you look at the speedometer
- Use regeneration brake modes (B and EB) when descending
long hills.
- Using the brakes for other situations regenerates almost
as much, and is far easier to modulate.
- The accessory that uses the most traction pack power
is the HVAC system. Use it only when needed
- Do not cycle it, since the startup takes a bunch of
power while giving you nothing.
- Drive about 2MPH slower, and you'll save more power
than the HVAC consumes.
- Use Rav4INFO to
play the "I can use less energy than THAT!" game.
- Try to score the lowest SOC percentage loss with each
mile.
- Switch to Wh/mile display every once in a while to
see how you're doing in real time.
- Realize that this is an easy
game to win going down hill with regen on. ;)
- Use the yellow and red zones of the SOC gage.
- 23% of the SOC is hiding down there, and you certainly paid for it. HOWEVER... while this will increase your range today, using the battery at LOW SOC (at the high current required to push the car) will hasten the demise of the battery pack.
- Fresh Wax job. (optional)
- Drive slower!
* Note: Once you get good at this, you'll be
amazed at how relaxing it can be, and how much your driving skills improve.
These techniques can also turn a 30mpg ICE into a 40mpg ICE.
How can the battery fans be operated with Toyota's hand-held scanner?
A: ince both blowers are 1/3 hp fans (they draw 18 amps or so from our nominal 12 V source - 13.6V when the DC-DC and car is on). When the car is off, all that power is drawn from the Aux battery alone, which will drain the little thing to a near-fatal level in short order. Beware! Use a (shore powered) battery charger hooked to that aux battery when doing this for any length of time.
- On the OBD menu there are four choices:
- 1 Codes, 2 SRS Airba, 3 E, 4 Battery
- Select 4 Battery with 'Enter'
- On the Diagnostic menu there are 3 selections
- 1 Data list, 2 DTC Info, 3 Active Test.
- Select 3 Active Test with 'Enter'
- Scrolling down with the up/down arrow keys you'll see:
- Cool Fan 1, Cool Fan 1 & 2.
- Select Cool Fan 1&2 and then 'All'
- Confirm your car is on (mislabeled as 'ignition' on). Yes there are two speeds. These instructions will guide you to the choices. Actual operation may be different than what is described...
- There is a bug in the code in that you'll possibly suffer a "loss of communication with the vehicle" necessitating a start again from the top of the menu tree.
- Cool Fan 1 and Cool Fan 2 are controlled with right arrow to turn on, and left arrow to turn off.
Best shipper when I sell my car?
A: One recommendation: Autozipper; 562-430-0020. Talk to Brian.
You must have more ideas for this FAQ. Please
send an email: info at evnut dot com